Introduction Link to heading
I have a huge collection of mechanical keyboards (> 15 and counting); when I started the journey, I mainly chose TKL layouts, which seemed the simplest choice for a desktop keyboard; they have all the keys I need, such as Home, End, PgUp, PgDown, that at least for me are essential for my writing habits. The issue with this layout is that you have to move your hands a lot to reach some keys, and the mouse is far away from the keyboard, so I started to look for smaller keyboards, such as 60%, 65%, and 75% sizes.

Image from Reddit
That’s when I started to experience the pain of missing keys and the need to remap them to have a consistent experience across all the keyboards I use without using the software provided by the keyboard manufacturer, which is often Windows only and not very flexible. That’s why, from some time on, I just used QMK/VIA compatible keyboards, which are fully programmable and open-source, but that’s another story.
I am also a heavy user of MacOS laptops, and Apple, IMHO, has the best keyboard layout ever designed for a standard computer keyboard. I love the Fn key, which allows you to access the Home, End, PgUp, PgDown keys without clashing with other system shortcuts. This is especially true because Fn is a hardware key and cannot be remapped by the OS.
I am talking about this Macbook keyboard layout:

Versus the standard PC layout of mechanical keyboards:

As you can see, the biggest difference is the position of the Fn key, which is always placed on the right side of the spacebar on mechanical keyboards, which makes it impractical to use it as a modifier key for the navigation keys. I don’t know if this is a standard or a convention, but every mechanical keyboard follows this layout. This has always been the most significant issue when using a mechanical keyboard, especially on Linux and with smaller keyboards.
As far as I know, in the PC market, only the Thinkpad keyboards have the
Fnkey on the left side of the spacebar, like Macbooks. They even produce a USB keyboard with the same layout.
Another important key used on Linux to take screenshots is the Print Screen key, randomly mapped on mechanical keyboards <= 65% sizes. This is not a problem on MacOS since the Print Screen key is not even present on the Apple layout. It is just a combination of keys, which is Cmd + Shift + 3 for the whole screen and Cmd + Shift + 4 for a selection, which I find more practical than having a dedicated key.
Keys to remap Link to heading
So, to make a summary here, the main keys I wanted to remap on Linux are:
Home->Cmd + LeftEnd->Cmd + RightPgUp->Cmd + UpPgDown->Cmd + DownPrint Screen->Cmd + P
Linux Kernel, evdev and libinput Link to heading
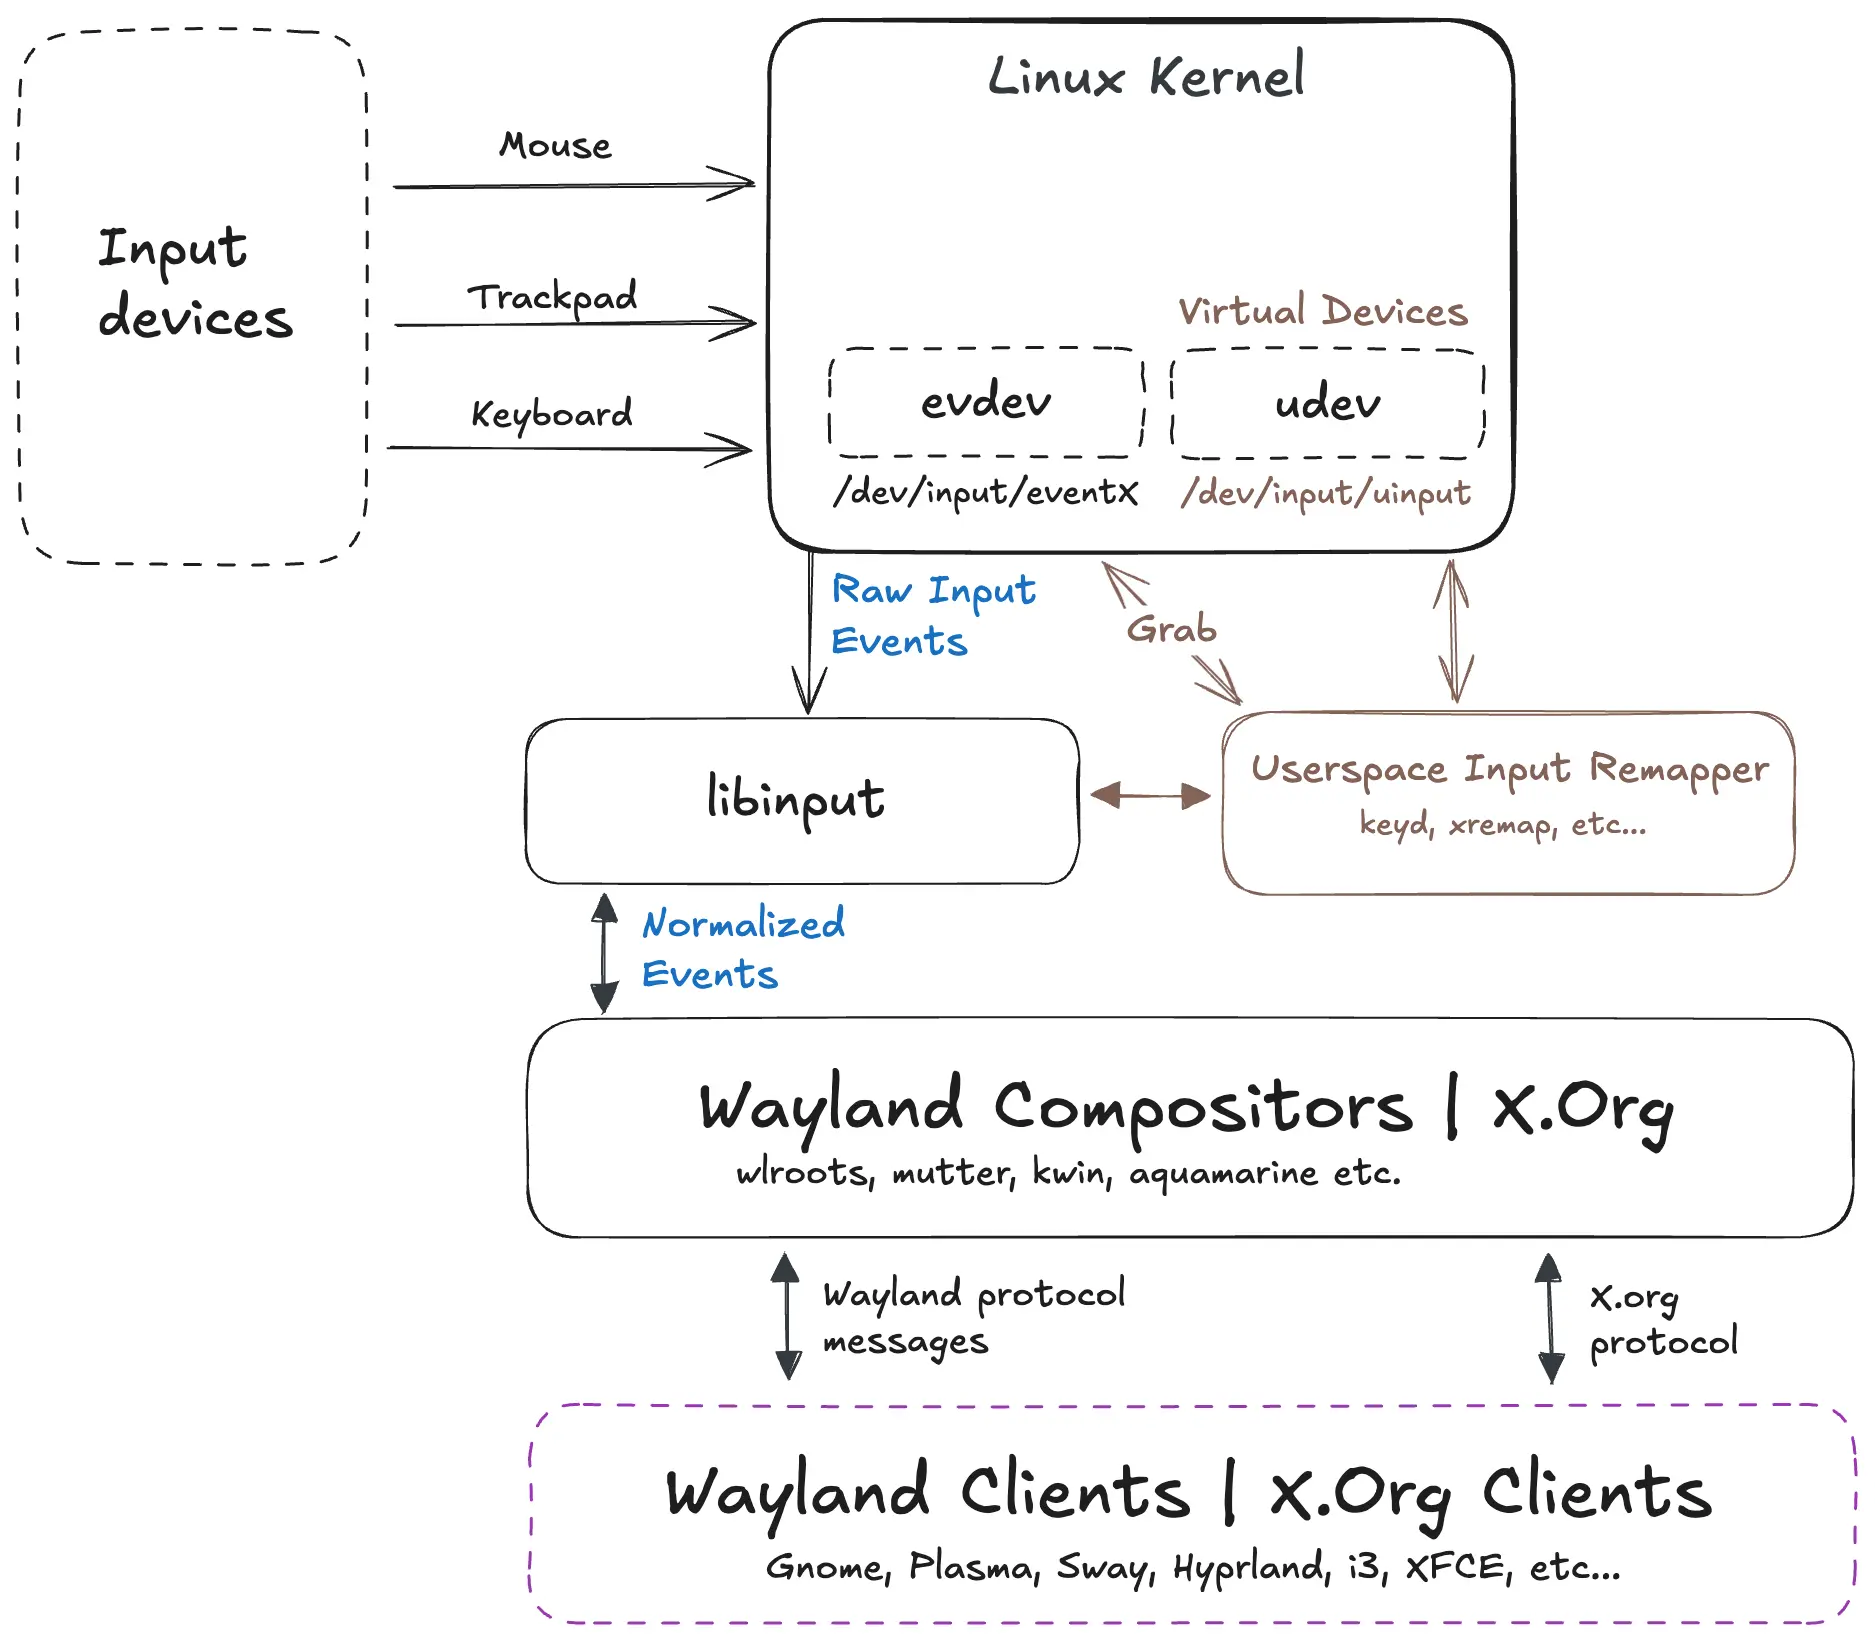
Before diving into the remapping tools, it is essential to understand how the Linux kernel handles input devices, the most common way to interact with input devices is through the evdev interface, which is a generic input event interface in the Linux kernel, which allows multiple devices to be read as a single stream of events, it is a very low-level interface, and it is not very user-friendly, so most of the time you will interact with it through a higher-level library, such as libinput.
This is a quick and dirty diagram I made with Excalidraw (which is a great tool, BTW) that shows how the components interact with each other:

As we can see, the input devices are managed by the kernel, which exposes them through the evdev interface. The libinput library, which provides a high-level API to interact with input devices, is then read by the libinput library. It is used by most desktop environments and window managers on Linux, such as Gnome, KDE, Sway, etc.
Another core component in this architecture is the uinput kernel module, which is a kernel module that allows userspace to create virtual input devices that can be used to remap keys, create macros, etc. This is the module that most of the remapping tools use to remap keys on Linux, including xremap and keyd.
An example of input implementation in Python (using the evdev library) which remap the Caps Lock key to Left Ctrl:
| |
An important thing to note here is the physical_device.grab() call, which blocks other processes from reading the device, this is important because if you don’t do this the events will be sent to both the real and the virtual device, which will cause events to be replayed twice.
Remapping tools on Wayland Link to heading
Now that we have a basic understanding of how input devices are managed on Linux, we can start to look at the tools that allow us to remap keys. These tools may be capable of managing both X11 and Wayland. Even though Wayland support nowadays is quite good, there are some edge cases where using X.org or Xwayland is still needed, so it is better to have a tool that works on both.
Just some words about Wayland, Wayland is just a protocol. Unlike X11, it does not come with a built-in compositor to be reused across different desktop environments, so every DE has to implement its own compositor (such as wlroots, mutter, kwin etc…), which is a good thing because it allows for more flexibility and better performance, but it also means that the old tools that worked on X11 do not work anymore, such as xmodmap, xinput, etc…
Anyway, there are tools that work on Wayland, such as keyd (only Wayland) and xremap (X11 and Wayland). From my research, they are the most complete and actively maintained tools for key remapping on Wayland, and they both work at the low-level using evdev and input.
They are quite similar in terms of features. They can remap keys, create macros, remap mouse buttons, and remap specific applications or devices. They both have a configuration file that allows you to define the remapping rules, which is very powerful and flexible. They also have a daemon mode that allows you to run them in the background and apply the remapping rules automatically.
My configuration Link to heading
When I started looking for a good remapping tool, I found xremap and decided to give it a try; I found it very easy to use and powerful. It is written in Rust, and it is very fast and lightweight; it is also very well documented, and it has a lot of examples in the repository, which is very helpful.
Other bonus points are that:
- It is cross-platform; it works on both X11 and Wayland.
- The configuration file is YAML-based.
- It supports many Wayland compositors, including all wlroots-based compositors (Sway, Wayfire, River, etc.), Gnome, KDE, and Hyprland.
- It is written in Rust, which is a big plus for such a low-level component because it is based on a memory-safe language.
This not means that keyd is not a good tool; I just didn’t have time to test it, so I cannot say if it is better or worse than xremap, but I think that the choice of the tool is very personal and it depends on the specific use case, so I suggest you to try both and see which one fits better for you.
I use Sway as my main compositor, and like i3 it uses CMD as the main mod key and the default configuration provides those shortcuts:
CMD + Left-> Move focus to the leftCMD + Right-> Move focus to the rightCMD + Up-> Move focus to the upCMD + Down-> Move focus to the down
They are very strongly hooked up into my muscle memory, so I preferred not to change them. So, I decided to use Left Alt as my main mod key to remap the navigation keys. This is a bit less comfortable than CMD, but it is the best compromise I found for now. I am still experimenting with this setup, so I will update this post if I find a better solution.
Here is my xremap configuration file:
| |
This configuration does the following things:
- Remap the navigation keys to
Left Alt + Arrowkeys. - Remap the
Print Screenkey toWin + P. - Remap some common shortcuts to
Ctrl + Insert,Shift + Insert,Ctrl + Z,Ctrl + S,Ctrl + X,Ctrl + -,Ctrl + =. - Swap
Left AltandRight Altin Chrome-based applications becauseLeft Altis already used by Electron apps to access the menu—this is the most invasive change I had to make. Anyway, I never useLeft Altin Chrome for shortcuts, so it is not a big deal for me. - Remap
Right CtrltoRight Alton my wooden mechanical keyboard, which is a 60% keyboard, and it does not have aRight Altkey, so I decided to use theRight Ctrlkey as a replacement.
As I want to start xremap automatically when I start my session, I created a system service that starts the xremap daemon; here is the service file:
| |
Just place this file in ~/.config/systemd/user/xremap.service and then run:
| |
Conclusions Link to heading
I am still experimenting with this setup, so I will update this post if I find a better solution, especially for the Left Alt remapping that I still find it too invasive and it opens the door for some subtle bugs, such as this one.
Anyway, I am quite happy with the result, I can now swap keyboards without having to lose time to reconfigure the layout using some crap software provided by the manufacturer and making the writing experience between Linux and MacOS more similar.
If you want to discuss this post, feel free to use this Github Discussion.
You must be authenticated on Github to use it, otherwise you’ll see a 404 page.